✍️ R. Veenarani, Assistant Director (Retd.), Department of Agriculture | veena4raghavan@gmail.com
The color, appearance, and smell of the soil can, to some extent, give an indication of the soil’s basic quality. An unbalanced application of fertilizers can do more harm than good to the quality. Therefore, fertilizer application should be based on soil testing.
The accuracy of soil testing depends on the collection of the soil sample. The amount of a soil sample taken for testing is only 500 grams. At the same time, this sample must represent the total soil and character of the farm. Therefore, care is needed when collecting the sample.
Not every part of the farm is suitable for sample collection. Selecting the wrong spots leads to inaccurate test results and poor fertilizer decisions. The following locations must be avoided:
- 🌿 Primary and permanent parts of plants
- 🚧 Areas that demarcate the farmland boundaries
- 🛣️ Roadsides and pathways
- 💧 Water channels and irrigation lines
- 🏜️ Areas during drought conditions
- 🌊 Waterlogged or flooded areas
Soil collection should be avoided during drought or waterlogged conditions entirely.
The depth at which soil is collected varies depending on the type of land. Collecting at the wrong depth will produce results that do not reflect the actual root zone of your crops.
🌱
Normal / Regular Farm Areas
Collect soil from a depth of 15 cm
🌿
Lawns
Collect soil from a depth of 5 cm
The growth of crops and the nature of the soil will be different in each part of the same farm. Therefore, the field should be divided into different sections, and different soil samples should be collected to represent each section.
Sections with ridges, nursery beds, or recently started cultivation areas should each be treated as separate sampling zones to ensure the test results represent the real variation across the land.
- 1From the area where the sample is to be taken, remove scattered leaves on the surface of the soil and dry leaves.
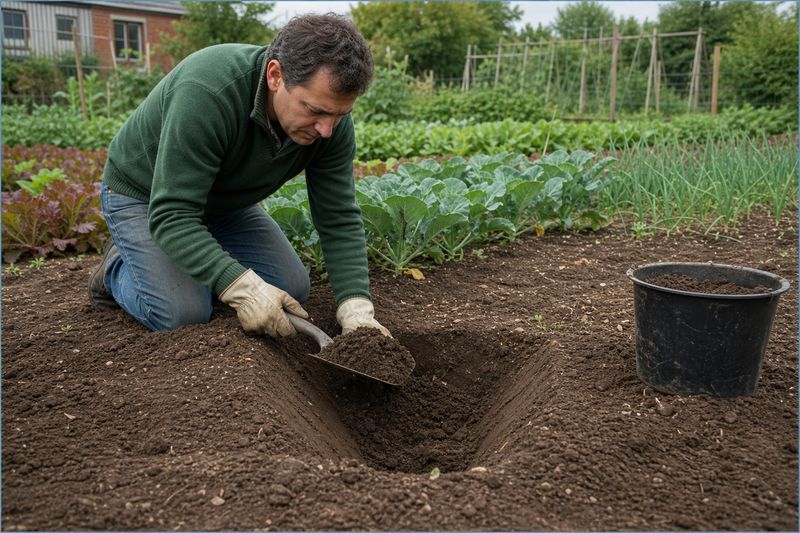
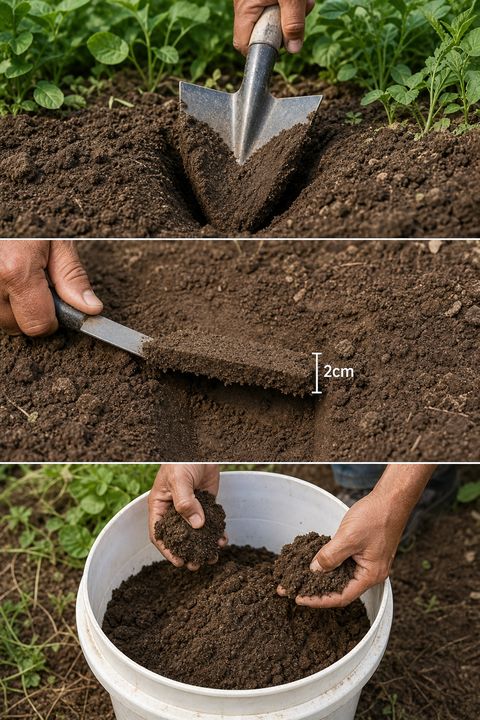
- 2Using a spade or a shovel, dig a pit in the shape of the English letter V.
- 3From the sides of the pit, from top to bottom, scrape and collect a 2 cm thick slice of soil.
- 4Repeat this from approximately 10 such spots and keep all the collected soil in a clean bucket.
- 5Mix the soil collected from all different parts thoroughly.
- 6From this mixed soil, take 500 grams as the final sample for testing.
- 7Remove impurities such as stones, plant roots, incompletely decomposed leaves, pieces of wood, and shells before packing.
⚠️ Watch Out for These Impurities
Always remove the following before sending your sample for testing: stones, plant roots, incompletely decomposed leaves, pieces of wood, and shells. Leaving these in the sample will affect the accuracy of the test results.
Along with the soil sample, the following details must be recorded and provided to the testing authority for a meaningful analysis:
🌾
Type of crop currently being cultivated
📅
3-year history of the farm
🏔️
Nature of the soil (highland, waterlogged area, etc.)
📍
Area of the farm where the sample was collected
🗓️
Date the sample was collected
👨🌾
Farmer’s name
💡 Need Help? If you contact the nearby Krishi Bhavan, the agricultural officer will guide you through the entire sample collection and submission process.